Beginner Solution
This page will help beginners and dummies on how to solve the Rubik's cube.. but first you need to learn the move notation.. go to the move notation index... Then, you can start learning...
THE SOLUTION
The First Layer The first layer is solved in two stages:
1. form the cross
2. inserting 4 first layer corners
I believe that the first layer should be done intuitively. You need to understand it and solve it without learning algorithms. Until you can do this, I wouldn't bother attempting the rest of the cube! So, spend some time playing with the cube and familiarising yourself with how to move the pieces around the cube.
Now, here are some tips to get you started.
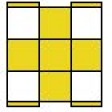
The Cross
I prefer to start with the white cross because I find white easier to quickly identify on a completely scrambled cube, however, you can use any colour.
There are 4 edge pieces with white (ie. the 4 arms of the cross) which have specific positions. You can't put any white edge piece in an arm of the cross because the other colour on the edge cubie must match up with it's centre on the middle layer.
Here is a pic of what a correctly formed cross look like..

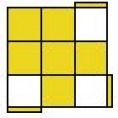
The First Layer Corners
Once you have completed the cross, completing the first layer requires inserting each of the 4 corners in separately. The first thing to do is examine your cube and locate all of the top layer edge pieces - they will be sitting in either the first layer or the last layer. Inserting the first layer corners should be done intuitively, not by learning algorithms. Down here is a step by step algorithms.. which is R' D' R D.


Here are some tips for inserting the top layer corners:
Start with a first layer corner that is sitting in the last layer.
If there are multiple first layer corners in the last layer (there usually will be), start with one that does not have the white part of the corner on the face opposite the white face. Or, if you were using a different colour for the cross ('colour X'), start with a corner that does not have the 'colour X' part of the corner on the face opposite the 'colour X' face.
When working with a first layer corner piece that is in the first layer (but in the wrong first layer corner position), you will need to get it out of the first layer into the last layer, then insert it into the correct first layer corner position. The same principle applies if a first layer corner piece is in the correct first layer corner position but needs to be flipped around. You need to get it out of the first layer (ie. into the last layer), and then re-insert it into the first layer the correct way around.
This is what the first layer should look like when finished.

All the four corners are correctly placed
The Middle Layer/Second Layer
The middle layer consists of one stage:
1. Insert the 4 middle layer edges (each edge is inserted individually).
You only need to learn one algorithm (plus the mirror algorithm) for the second layer. There are many more algs, but let's just learn the essential one first.
First, turn the cube so the finish face is on the bottom, then, locate a middle layer edge that is currently sitting in the last layer. I'm going to use the red/green edge for this example.
Inserting edge to the right
The algorithm for this case is: U R U' R' U' F' U F
Inserting edge to the left
Before you perform this algorithm, choose the left face(in this pic is green center) so that the face will be your front. Then the algorithm is: U' L' U L U F U' F'.
Flipping one edge into a correct position
In this case, it can be done in 2 ways:
1. The edge piece must be rotated out, then start with either one of the algorithms as shown above.
2. Performing this algorithm: R2 U2 F R2 F' U2 R' U R'
The Last Layer
The last layer ("LL") is done in 4 steps:
1.Orient the edges (2 algs) - i.e. form a cross on the U face.
2.Permute the corners (1 alg) - i.e. get the corners in the correct position in 3D space (don't worry if they still need to be rotated).
3.Orient the corners (1 alg + mirror alg) - i.e. flip the corners.
4.Permute the edges (1 alg) - i.e. swap the edges around. The cube should now be solved! :)
All last layer algorithms are performed with the cross (i.e. the first layer - white side in this example) on the bottom.
Orienting the LL edges
Once you have completed the first two layers ("F2L"), hold the cube so that the white side is on the bottom. The white side will be on the bottom for the remainder of the solution. This means that the white side is the D side for all last layer algorithms.
On my cube, white is opposite yellow, therefore yellow is the U face for all last layer algorithms on my cube. Note that your cube may have a different colour opposite white (e.g. blue). Now have a look at your last layer, and in particular, look at the last layer face - there are 4 possible patterns of LL edges that you may see.
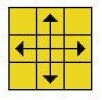
State 1

All the edges are already oriented correctly. Move on to permuting the corners.
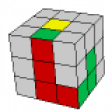
State 2

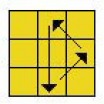
We are going to re-orient our faces for this algorithm. The face you are looking directly at in this picture is now the U face (it was the D face for when you were doing the second layer edges). Perform the following algorithm: F U R U' R' F'
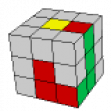
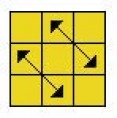
State 3

As with State 2, the face you are looking directly at in this picture is now the U face. Perform the following algorithm: F R U R' U' F'
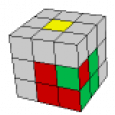
State 4

State 4 is really a combination of States 2 and 3, so all you need to do is perform the algorithm for either State 2 or State 3. Once you've done this, you'll see that your LL edges now look like State 2 or State 3, so just perform the appropriate algorithm and you will have a cross on the LL.
Permuting the LL corners
The two possible states are:
1.two adjacent LL corners need to be swapped; or
2.two diagonal LL corners need to be swapped.
These are the only two possible states. If you cannot identify one of these two states with your LL corners then one or more of the following must be true:
1.You have not finished the F2L.
2.Someone has ripped out a corner of your cube and put it in the wrong way.
3.Someone has ripped off some of your stickers and put them back in the wrong place.
4.You are not looking hard enough. ;)
Swapping Adjacent Corners
Hold the cube with the white side on the bottom, and the two corners to be swapped are in the front right top and the back right top positions. Perform the following algorithm: L U' R' U L' U' R U2.
Swapping Diagonal Corners
Swapping diagonal corners can be done by executing the adjacent corner swap algorithm twice. Perform it once to swap any two LL corners. Re-examine you cube and you'll see that now there are just two LL corners that need to be swapped. Position it correctly for the final LL adjacent corner swap and perform the LL adjacent corner swap algorithm.
Orienting the LL corners
There are 8 possible orientation states for the LL corners. One is where all 4 corners are correctly oriented. The other 7 look like this.


State 1- Orienting 3 corners anti clockwise
R' U' R U' R' U2 R U2
State 2- Orienting 3 corners clockwise
R U R' U R U2 R' U2
State 3 - State 7
Once you know the algorithms for States 1 and 2, you can solve any LL orientation State. The remaining States can be oriented using a maximum of 2 algorithms. You will need to do one of the following (i) the State 1 algorithm twice, (ii) the State 2 algorithm twice, (iii) the State 1 algorithm, then the State 2 algorithm, or (iv) the State 2 algorithm, then the State 1 algorithm.
In a previous edition of this solution, I had said that I'm not going to tell you exactly how to combine the State 1 and State 2 algorithms to solve States 3-7. My reason for this was because it is important that you try to understand how the State 1 and the State 2 algorithms work, and that once you do understand them you will be able to work out how to use them to solve all the States. I still believe this, however, I received emails from a few people who were having trouble with States 3-7, so I decided to write some extra tips. I still suggest that you try to work out States 3-7 by yourself
Permuting the LL edges & SOLVED..
There are 5 possible permutation states for the LL edges. One is where all 4 edges are correctly permuted. The other 4 look like this.
State 1
R2 U F B' R2 F' B U R2
State 2
R2 U' F B' R2 F' B U' R2
This is almost identical to the algorithm for State 1. Only difference is the 2nd move and the 2nd last move.
State 3
Apply the algorithm for either State 1 or State 2. Re-examine your cube and it will now look like State 1 or State 2.
State 4
Apply the algorithm for either State 1 or State 2. Re-examine your cube and it will now look like State 1 or State 2.
And that's all you really need to know to solve the Rubik's Cube! With practice, you should be able to achieve times of 60 seconds (or faster) using this method. Once your comfortable with this method and want to learn more, take a look at the following section.
Next steps
If this beginner method is too easy and boring for you then consider the following.
Intermediate method
Solve each first layer corner + corresponding middle layer edge in one step. This means that after the cross you only have 4 steps (4 corner/edge pairs) to complete the F2L. With this beginner method there are 8 steps: solve each of the 4 first layer corners, then solve each of the 4 middle layer edges. I'd suggest just playing around with your cube and figuring out the F2L corner/edge pairs yourself. For some hints about solving the F2L intuitively, have a look at Doug Reed's intuitive F2L guide. If you're still stuck and just want the algorithms, check out Dan Harris' F2L page and Jessica Fridrich's F2L page.
Learn the 4 specific algorithms (or rather, 3 algorithms plus one mirror algorithm) for each of the 4 different permutation states of the LL edges. My beginner solution already shows you 2 of the 4 last layer edge permutation algorithms, the other two last layer edge permutation algorithms are Case #5 and Case #17 on Dan Harris' PLL page.
Advanced method
Learn everything from the Intermediate method.
Learn the 3-look LL. This requires learning the 7 specific algorithms for the 7 different orientation states of the LL corners, and learning the 21 PLL algorithms (permuting the last layer algorithms) so you can permute the LL edges and LL corners at the same time. A full 3-look LL uses 30 algorithms.
For more details about the advanced method, check out t Rubiks Galaxia 3-look LL, Dan Harris' site and Lars Vandenbergh's PLL page.
Expert method
Do the F2L in 5 steps (first dot point from the Intermediate method).
Learn a full 2-look LL. This requires memorising 21 PLL algorithms, plus 57 OLL algorithms (orienting the last layer algorithms).
For more details about the expert method, check out Dan Harris' site, Joël van Noort's site and Lars Vandenbergh's site.
